CLASS 10 DATABASE MANAGEMENT SYSTEM (TABLES/QUERIES, FORMS AND REPORTS)
LEARN THESE STEPS
DATABASE MANAGEMENT SYSTEM

ASSIGNMENT 1
Create a table "Customer" using Table Wizard.
Objectives- To aware the students about the steps to create table with Table Wizard method.Procedure-
Step 1- Open OO Base.
Step 2- Select "Create a new database" option to create a new database. Then Next.

Step 3- Select 'do not register' then Finish.

Step 4- Type the Database name 'CUSTOMER', select location Desktop and save. Step 5- Select "Use Wizard to create table" option.
 Step 7- Set the Fields information (Properties). Then Next.


 Result - Now table " Customers" is ready.

......................................................................................................................................................................


Step 6- Select the Fields for the Table. Then Next.


Step 8- Select the Primary key "CustomerID". Then Next.

Step 9- Select 'Insert data immediately' Then Finish. Step 10- Enter data in table. Save it and close it.


ASSIGNMENT 2
Create a table "Employee" using Design view.
Objectives- To aware the students about the steps to create table with Design view method.


..............................................................................................................................................
Procedure-
Step 1- Open OO Base.
Step 2- Select "Create table in Design View" option. Step 3- Enter fields name and Field Type. Set the properties of each field if required.


Step -4 Right click on TeacherID field and make it Primary key.

Step 5- Save the table with name "Employee". Save and close.

Result- Now you can see table "Employee" is ready. OPEN IT AND ENTER THE DATA.

ASSIGNMENT 3
Create a query using Query wizard.
Create a query (Firstname and phone number from Employee table)
Objectives- To aware the students about the steps to create a query using Query wizard.
Procedure-
Step 1- Open Existing database.
Step 2- Click on query option. Then select "Use wizard to create Query" option.
 Step 6- then Next.
 Step 7- Type the name of Query. Then Finish.

Step 3- Select the Table "Employee". Select the required fields from this table. Then Next.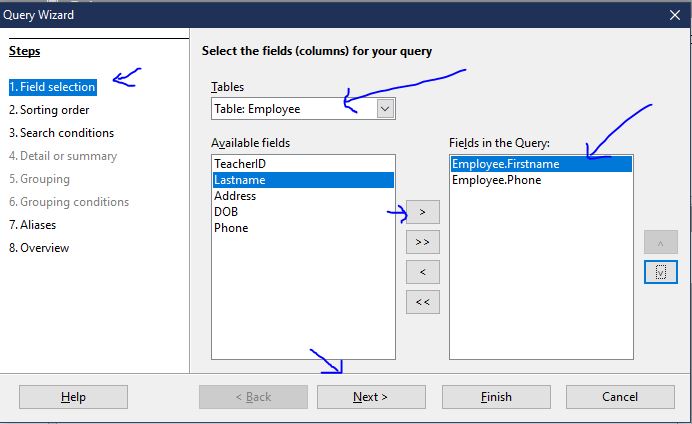 Step 4- Select the field for Sort by Ascending order. Then Next.
Step 5- Then Next.


..............................................................................................................................................................
ASSIGNMENT-4
Create a query using DESIGN VIEW.
Create a query (Firstname and phone number from Employee table)
Objectives- To aware the students about the steps to create a query using Design view.
ASSIGNMENT 6-
Procedure-
Step 1- Open Existing database.
Step 2- Click on query option. Then select "Create query with design view" option.
Step 3- Select Table "Employee" then click on Add option. Now table is added. close add Table window.

Step 4- Do the following settings. Step 5- Click on Save option then type the name of Query.Click on OK. and close it.

Step 4- Select the arrangements. Then Next. Step 5- Select any one of these. If you select first option, then only new data or record will be entered. Old data of the table "Employee" will not be displayed.


Result- Now query is ready. Open it and see.

................................................................................................................................................................
ASSIGNMENT 5-
Create a Form Using Wizard.
Create a Form from Employee table.
Objectives- To aware the students about the steps to create a Form.
Procedure-
Step 1- Select forms. Then select Wizard option. Step 2- Select the table "Employee". Select all Fields. Then click on Next option.
 Step 3- Click on Next.


If second option will be selected, then old data will be displayed and you can enter new data also.
Here we will select second option. Then Next. Step 6- Select Style and Field Border. Then Next.
 Step 7- Type the name of Form. then Finish.
 Result - Open form and you can see already entered four records are available. you can add new Records also. These will be displayed in Table "Employee".


CREATE REPORT USING WIZARD -
Create a Report from Customers table.
Objectives- To aware the students about the steps to create a Report. 
Step 2- Click on Report.
Procedure-
Step-1 Create table "Customers"

Step 3- Select option "Use Wizard to create Report".

Step 4- Select Table "Customers".
Step 5- Select all fields for report. Then Next".

Step 6 - Select CustomerID for Ascending order. Then "Next".
Step 6- Select Layout of data. Ten "Next".
Step 7- Type the title for Report.Then "Finish". Step 8- Now the following shows Report.


Step 7- Type the title for Report.Then "Finish".


.png)
Comments
Post a Comment